05:00
Lecture 5: The Final Workflow of Git, GitHub and Quarto with VS Code
BAA1028 - Workflow & Data Management
Damien Dupré
Discovering VS Code
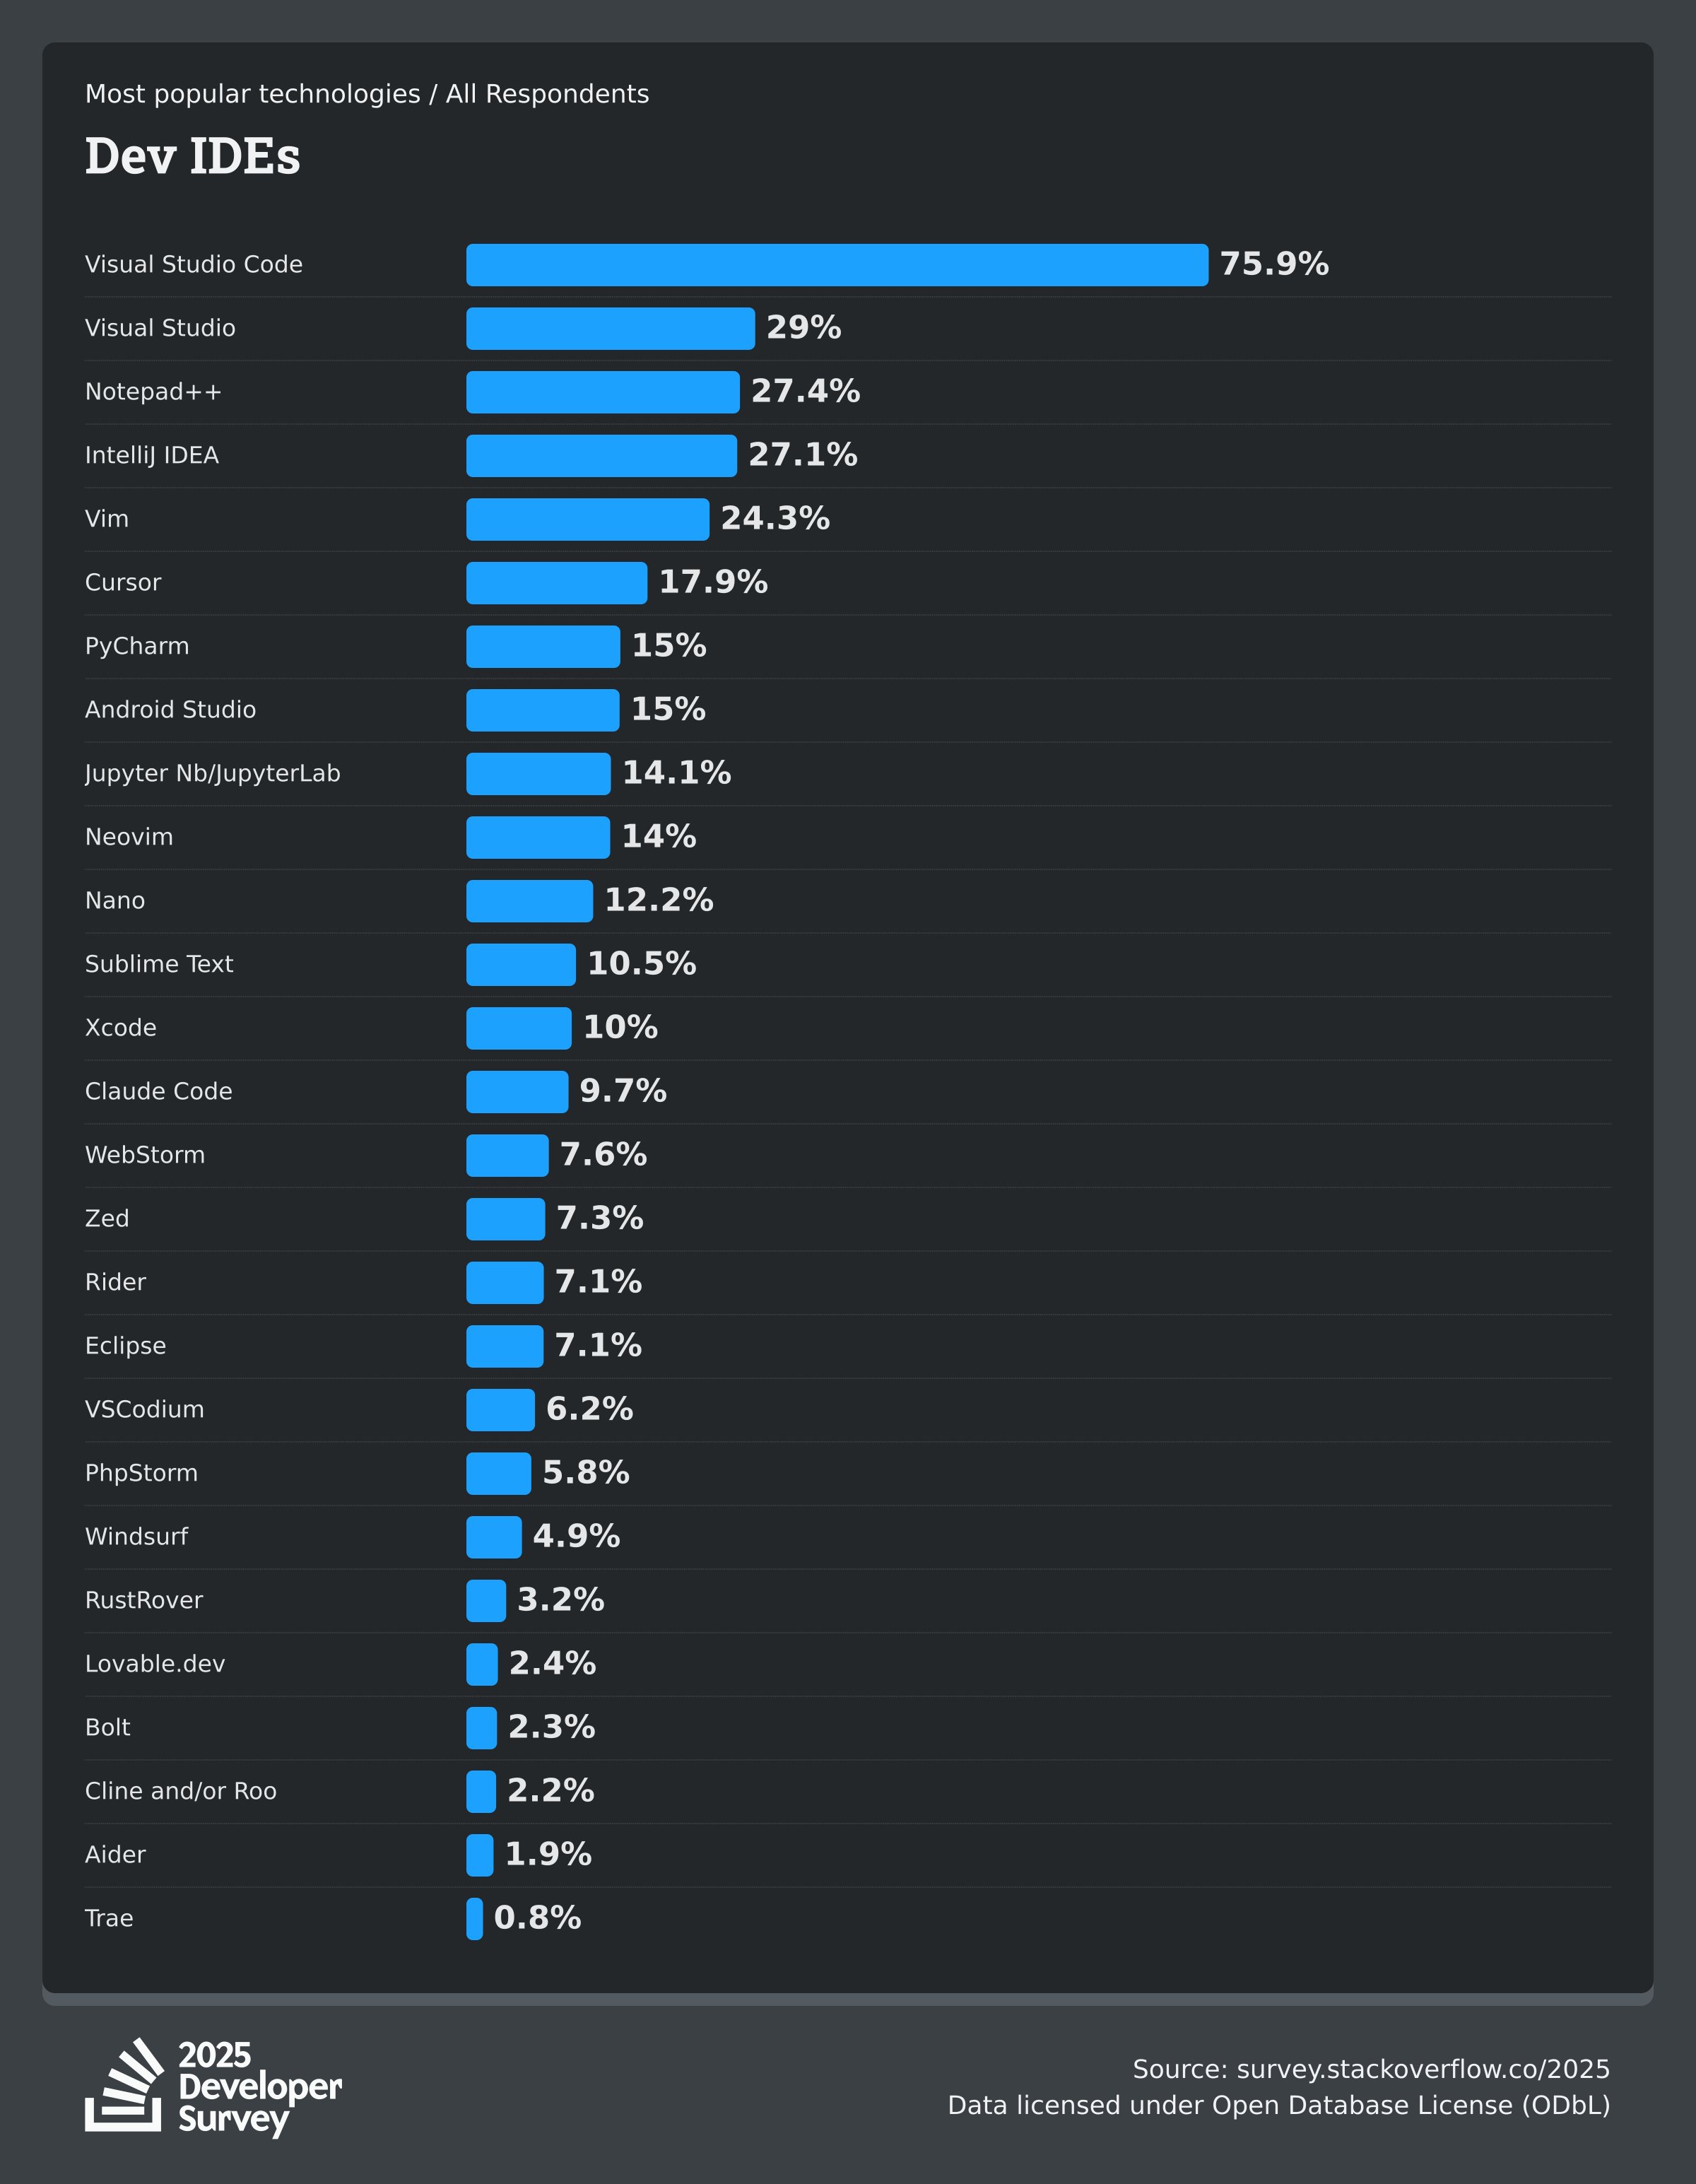
Which IDE to Use?
An Integrated Development Environment (IDE) is a software application that provides comprehensive tools to facilitate writing, testing, and debugging code.
Popular Python IDEs include PyCharm, Visual Studio Code (aka VS Code), Spyder, and IDLE.
Each offers unique features catering to different levels of expertise and use cases, from beginners to professional developers.
Which IDE to Use?
A good IDE enhances productivity by offering features such as:
- Code Editor – A text editor with syntax highlighting, auto-completion, and indentation support.
- Debugger – A tool to help identify and fix errors by allowing breakpoints, step-through execution, and variable inspection.
- Integrated Terminal – A built-in terminal for running bash without switching applications.
- Package Management – Easy installation and management of Python libraries and dependencies.
- Version Control Integration – Support for Git and other version control systems to track code changes.
- Project Management – Features to organise files, modules, and projects efficiently.
Which IDE to Use?
You have already experienced an IDE in Semester 1. While it is a useful tool, it is not the most widely used IDE if it’s not VS CODE.
I believe it would be beneficial to transition from a lesser-known IDE to one of the major contenders.
Which IDE to Use?
What is VS Code?
- Visual Studio Code (VS Code) is a free, open-source code editor developed by Microsoft.
- It supports multiple programming languages, including Python, JavaScript, C++, and more.
- Provides features like syntax highlighting, debugging, Git integration, and extensions.
Important
Visual Studio Code and️ Visual Studio are very different
Why Use VS Code?
- Lightweight and fast compared to full-fledged IDEs.
- Highly customisable with themes and extensions.
- Integrated terminal for running commands within the editor.
- Great support for multiple programming languages.
- Built-in Git support for version control.
VS Code is market leader with strong community!
Installing VS Code
Step 1: Download
- Go to the official VS Code website.
- Download the installer for your operating system (Windows, macOS, or Linux).
Step 2: Install
- Run the downloaded installer and follow the setup instructions:
- Windows users: https://code.visualstudio.com/docs/setup/windows
- MacOS users: https://code.visualstudio.com/docs/setup/mac
Installing VS Code
Once installed, you can launch VS Code directly from its short cut.
Then, need to download some essential extensions.
- On the left side of the window, there will be a bar with some icons.
- Click on the extensions icon to Open the Extensions Marketplace:
Alternatively, use the keyboard shortcut:
- Windows: Ctrl + Shift + X
- MacOS: Cmd + Shift + X
You could have a look at GitHub Copilot & GitHub Copilot Chat and any others that seem interesting or useful such as Prettier (for code formatting) or GitLens (for enhanced Git support)
Configure Settings and Environement
Optionally:
- Go to File > Preferences > Settings
- Adjust editor preferences, key bindings, and themes.
Configure Settings and Environement
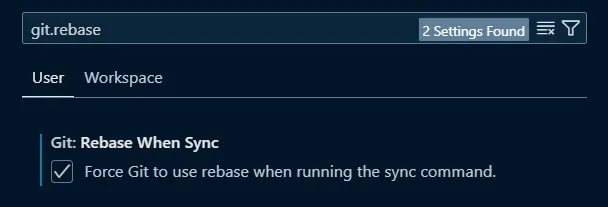
Important
An important setting in VSCODE has to be changed! Let’s do it together.
Go to the settings in VS CODE
Type
Rebase When Syncin the Search Settings barTick the box to force Git to use rebase
Visual Studio Code
Visual Studio Code
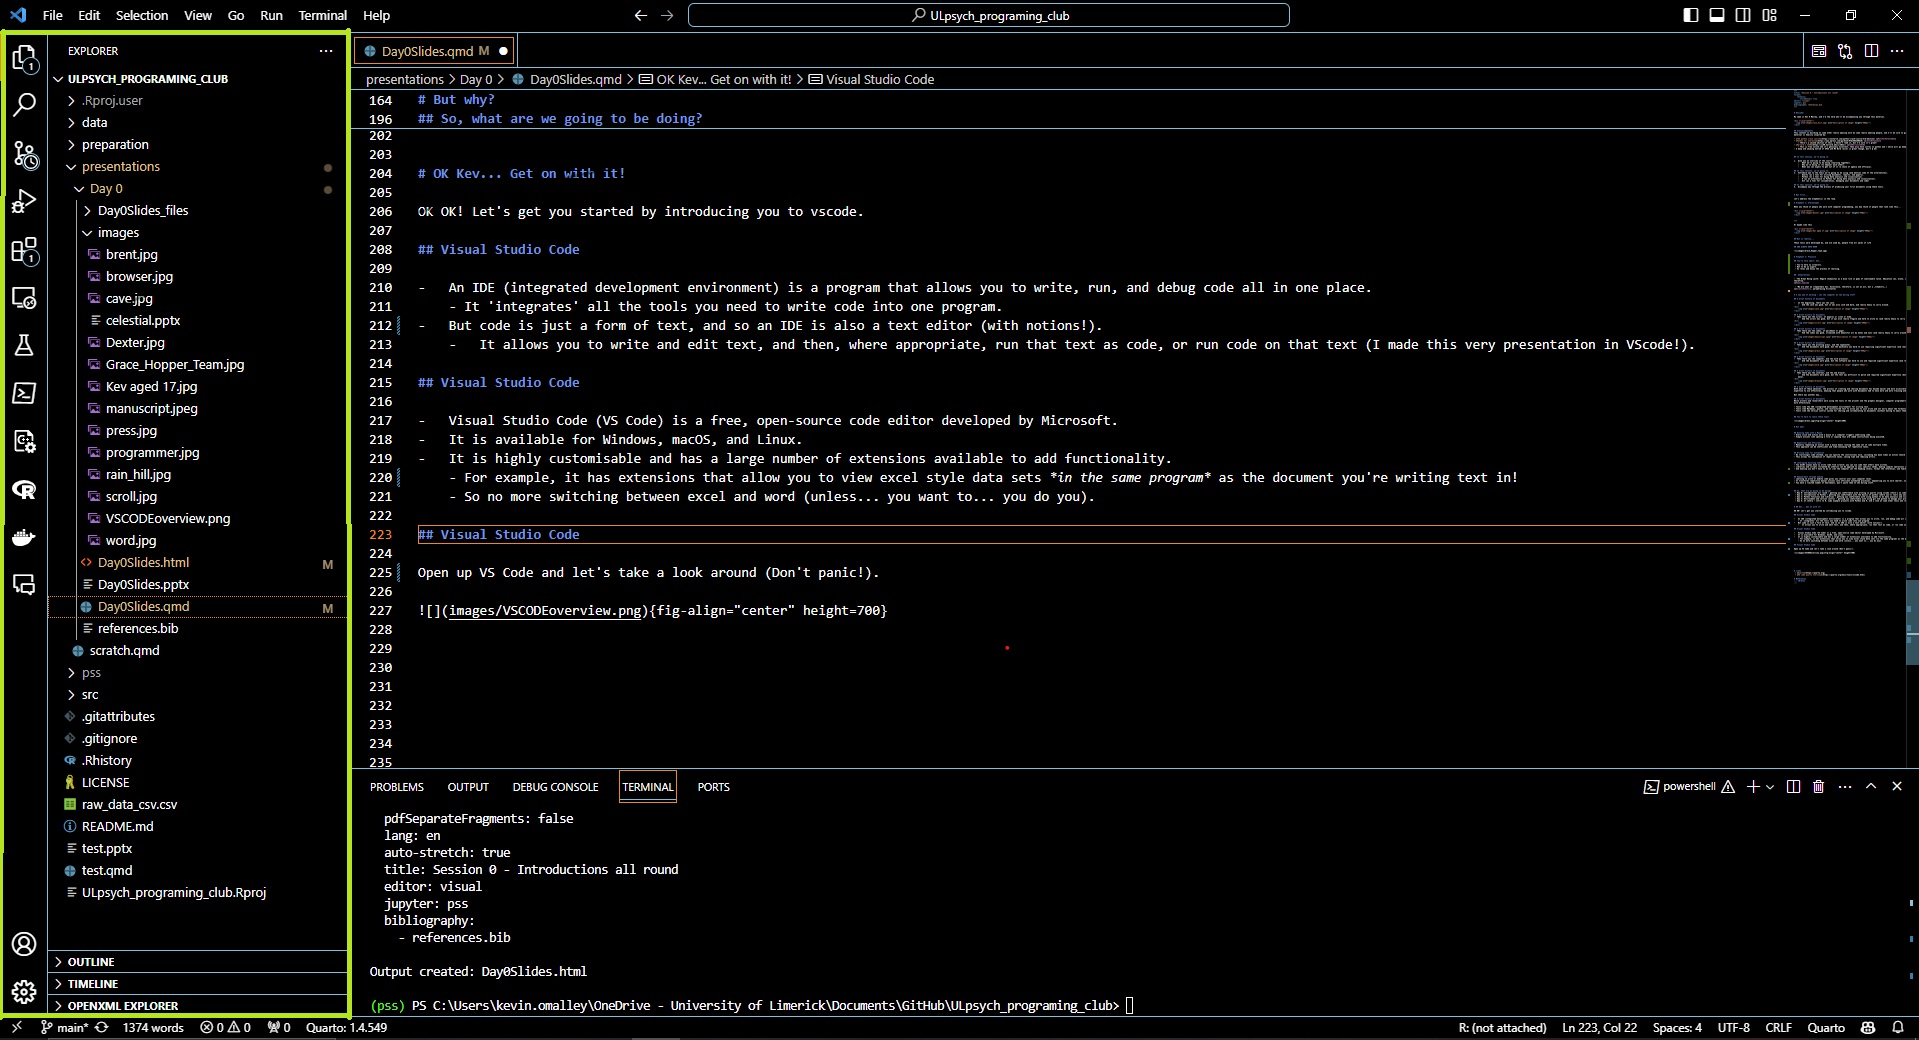
The left-hand side of the window is the activity bar.
- It contains icons for the different views and panels in VS Code.
- You can click on these icons to switch between views.
- The main one you’ll use is the ‘explorer’ icon, top of the activity bar, which will show you the files and folders in your project.
Visual Studio Code
Visual Studio Code
The bottom panel is the terminal.
- This is where you can run commands with a shell (e.g., BASH, ZSH, CMD, or PowerShell) and see the output of those commands.
- You can also run your code here.
- You can open the terminal by clicking on the
terminalicon in the bar along the top of the VS Code window.
Visual Studio Code
Visual Studio Code
The largest panel is the editor.
- This is where you write your code and text.
- But it’s also like a browser, you can have multiple tabs open at once, and different types of files
- You can split the editor into multiple panes to allow for previews, to view your data while you work, or even compare different parts of the same document!
Visual Studio Code
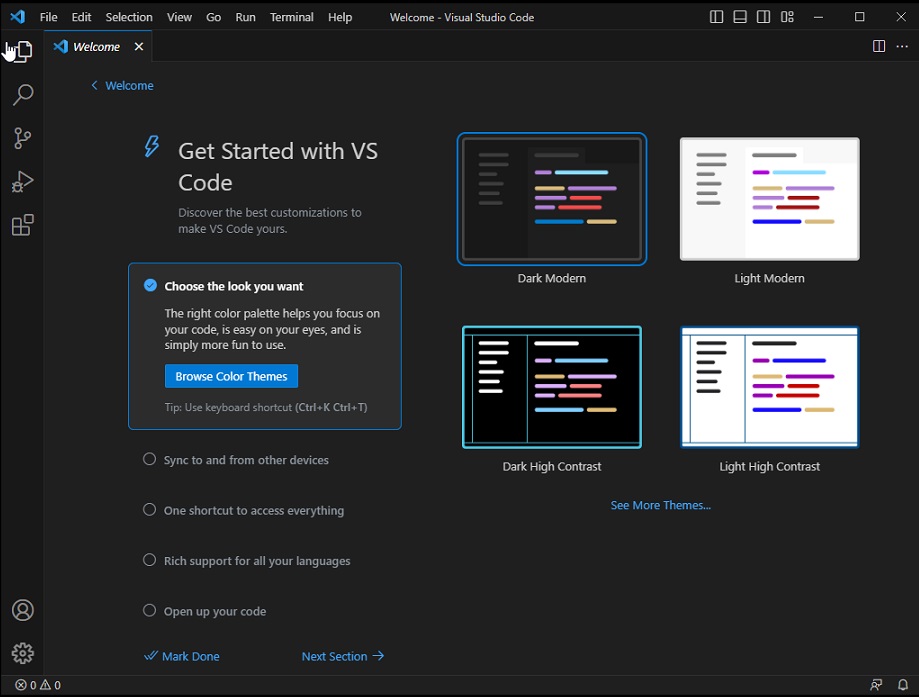
When you open VS Code for the first time, you’ll see a welcome screen, this gives you some options for how you want VS Code to look and feel, and some options for what you want to do with it.
Visual Studio Code
Do these choices matter? Not really so don’t stress. They are aesthetic choices, and you can change them at any time, but they’re there because you’ll be spending a lot of time in VS Code and you should be comfortable there.
- Take some time and look around the screen, I’ll be walking around to make sure that you see everything.
- Try out the different themes, and see what you like.
- When you’re ready click on the little blue ‘welcome’ button in the top left of the window to move on.
Practising Git and GitHub with VS Code
Let’s do all these following steps together
Check your Git Installation
You can verify your Git installation by typing in the VS Code terminal:
It the installation is correct, it should print the version of your Git (e.g., git version 2.33.1)
Git-GitHub Version Control with VS Code
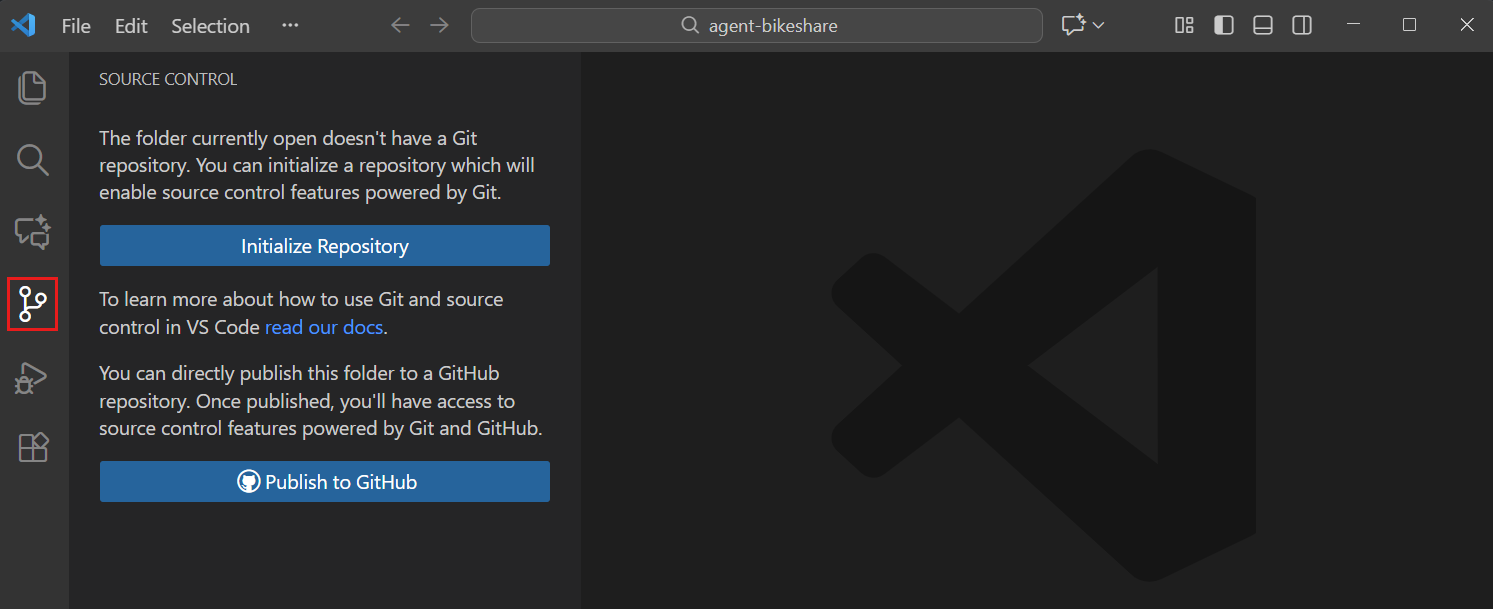
Create a Local Repository called
VSCODE_test_1in theprojectsfolder and add ahello.txtfile.Open
VSCODE_test_1in VS CodeIn the
Source ControlIcon of the left Pane, click onInitialize Repository
Add, Commit, and Push
To observe practice with the Git/GitHub workflow in VS Code:
In the
Source Controlpanel, click + inChangesto “Add” your changes.Then add a mandatory message and click ✔️ Commit
Click ☁ Publish Branch and select the public branch. You should see you little cloud icon climbing up the levels of yours commits.
Note
If you forgot the add files and directly click commit, VS Code will prompt a message proposing to add all files and commit them, which is convenient as well.
Connect VS Code to your GitHub Account
You should be prompted the following message:
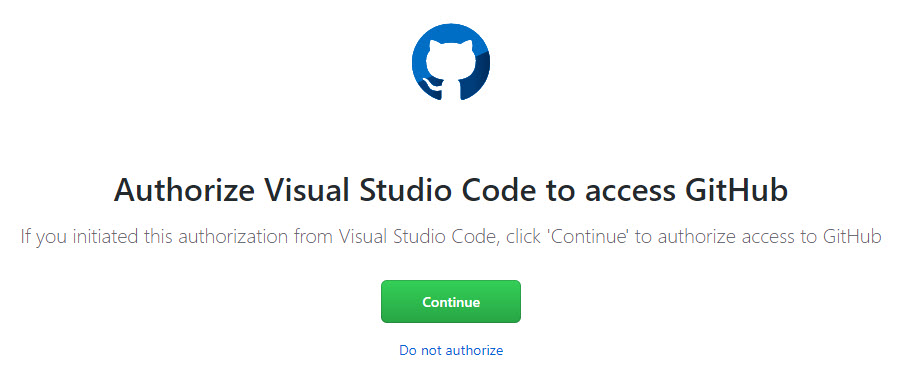
Click Continue
Add, Commit, and Push Again
Open your
hello.txtfile and make a new modificationIn the
Source Controlpanel, click + inChangesto “Add” your changes.Then add a mandatory message and click ✔️ Commit
Click Synch Changes. You should see you little cloud icon climbing up the levels of yours commits.
Note
If you forgot the add files and directly click commit, VS Code will prompt a message proposing to add all files and commit them, which is convenient as well.
Connect VS Code to your GitHub Account
Connect VS Code to your GitHub Account
These actions are the same and could be done from the terminal using the following code:
From Local to GitHub
From Local to GitHub
Let’s repeat these steps, but this time without cloning an already existing repository on GitHub. This time we will take a project on your computer and push it on GitHub.
Your Turn: Add, Commit, and Push
Create a
VSCODE_test_2repository and add ahello.txtfile.Open
VSCODE_test_2in VS CodeIn the
Source ControlIcon of the left Pane, click onInitialize RepositoryIn the
Source Controlpanel, click + inChangesto “Add” your changes.Then add a mandatory message and click ✔️ Commit
Click ☁ Publish Branch and select the public branch.
Open your
hello.txtfile and make a new modificationIn the
Source Controlpanel, click + inChangesto “Add” your changes.Then add a mandatory message and click ✔️ Commit
Click Synch Changes.
Using Quarto in VS Code
What is Quarto?
Quarto revolutionizes technical publishing by enabling you to write once, then render to multiple high-quality outputs.
Whether you need a polished PDF, a full-featured website, or an internal report, Quarto’s command-line tool, multi-language support, and tight Pandoc integration streamline the entire process.
With an active community, broad editor integrations, and flexible publishing options, Quarto offers a powerful path to reproducible and professional-grade data science communication.
What is Quarto?
Together: Installing Quarto
Outside VS Code (Quarto has it own app)
- Download from quarto.org
- Install with default settings
Verify Quarto’s installation by running:
Quarto needs both python and the jupyterlab libraries but we will sort this out later if you don’t have them.
–>
Practising Quarto
Quarto is an open-source scientific and technical publishing system that builds on standard markdown with features essential for scientific communication.
- Computations: Python, R, Julia, Observable JS
- Markdown: Pandoc flavoured markdown with many enhancements
- Output: Documents, presentations, websites, books, blogs
See https://quarto.org for more details
Practising Quarto
The Goal is to create a document that is all-in-one
- Documents that include source code for their production
- Notebook AND plain-text flavours
- Programmatic automation and reproducibility
And it has a template for websites, see tutorial here: https://adtarie.net/posts/007-quarto-python-tutorial/
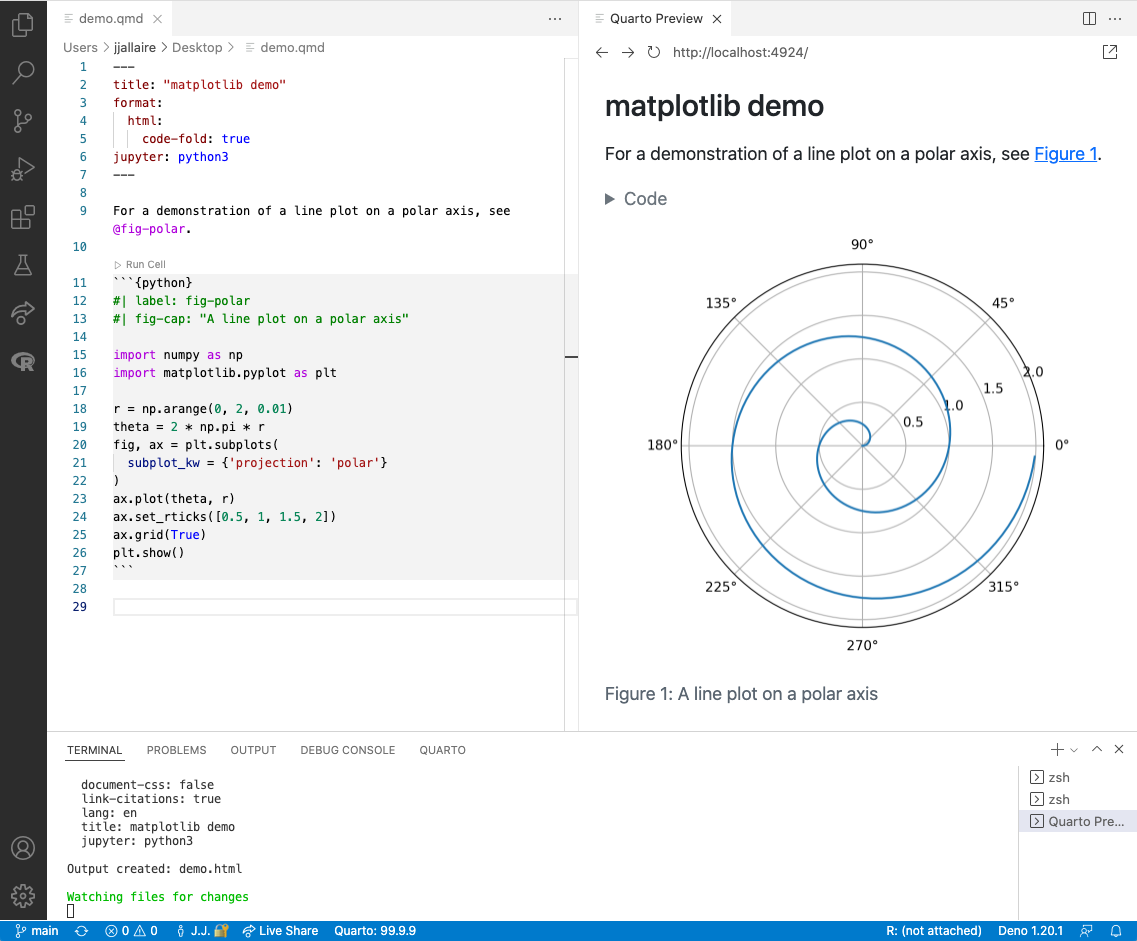
Quarto Editor vs Output
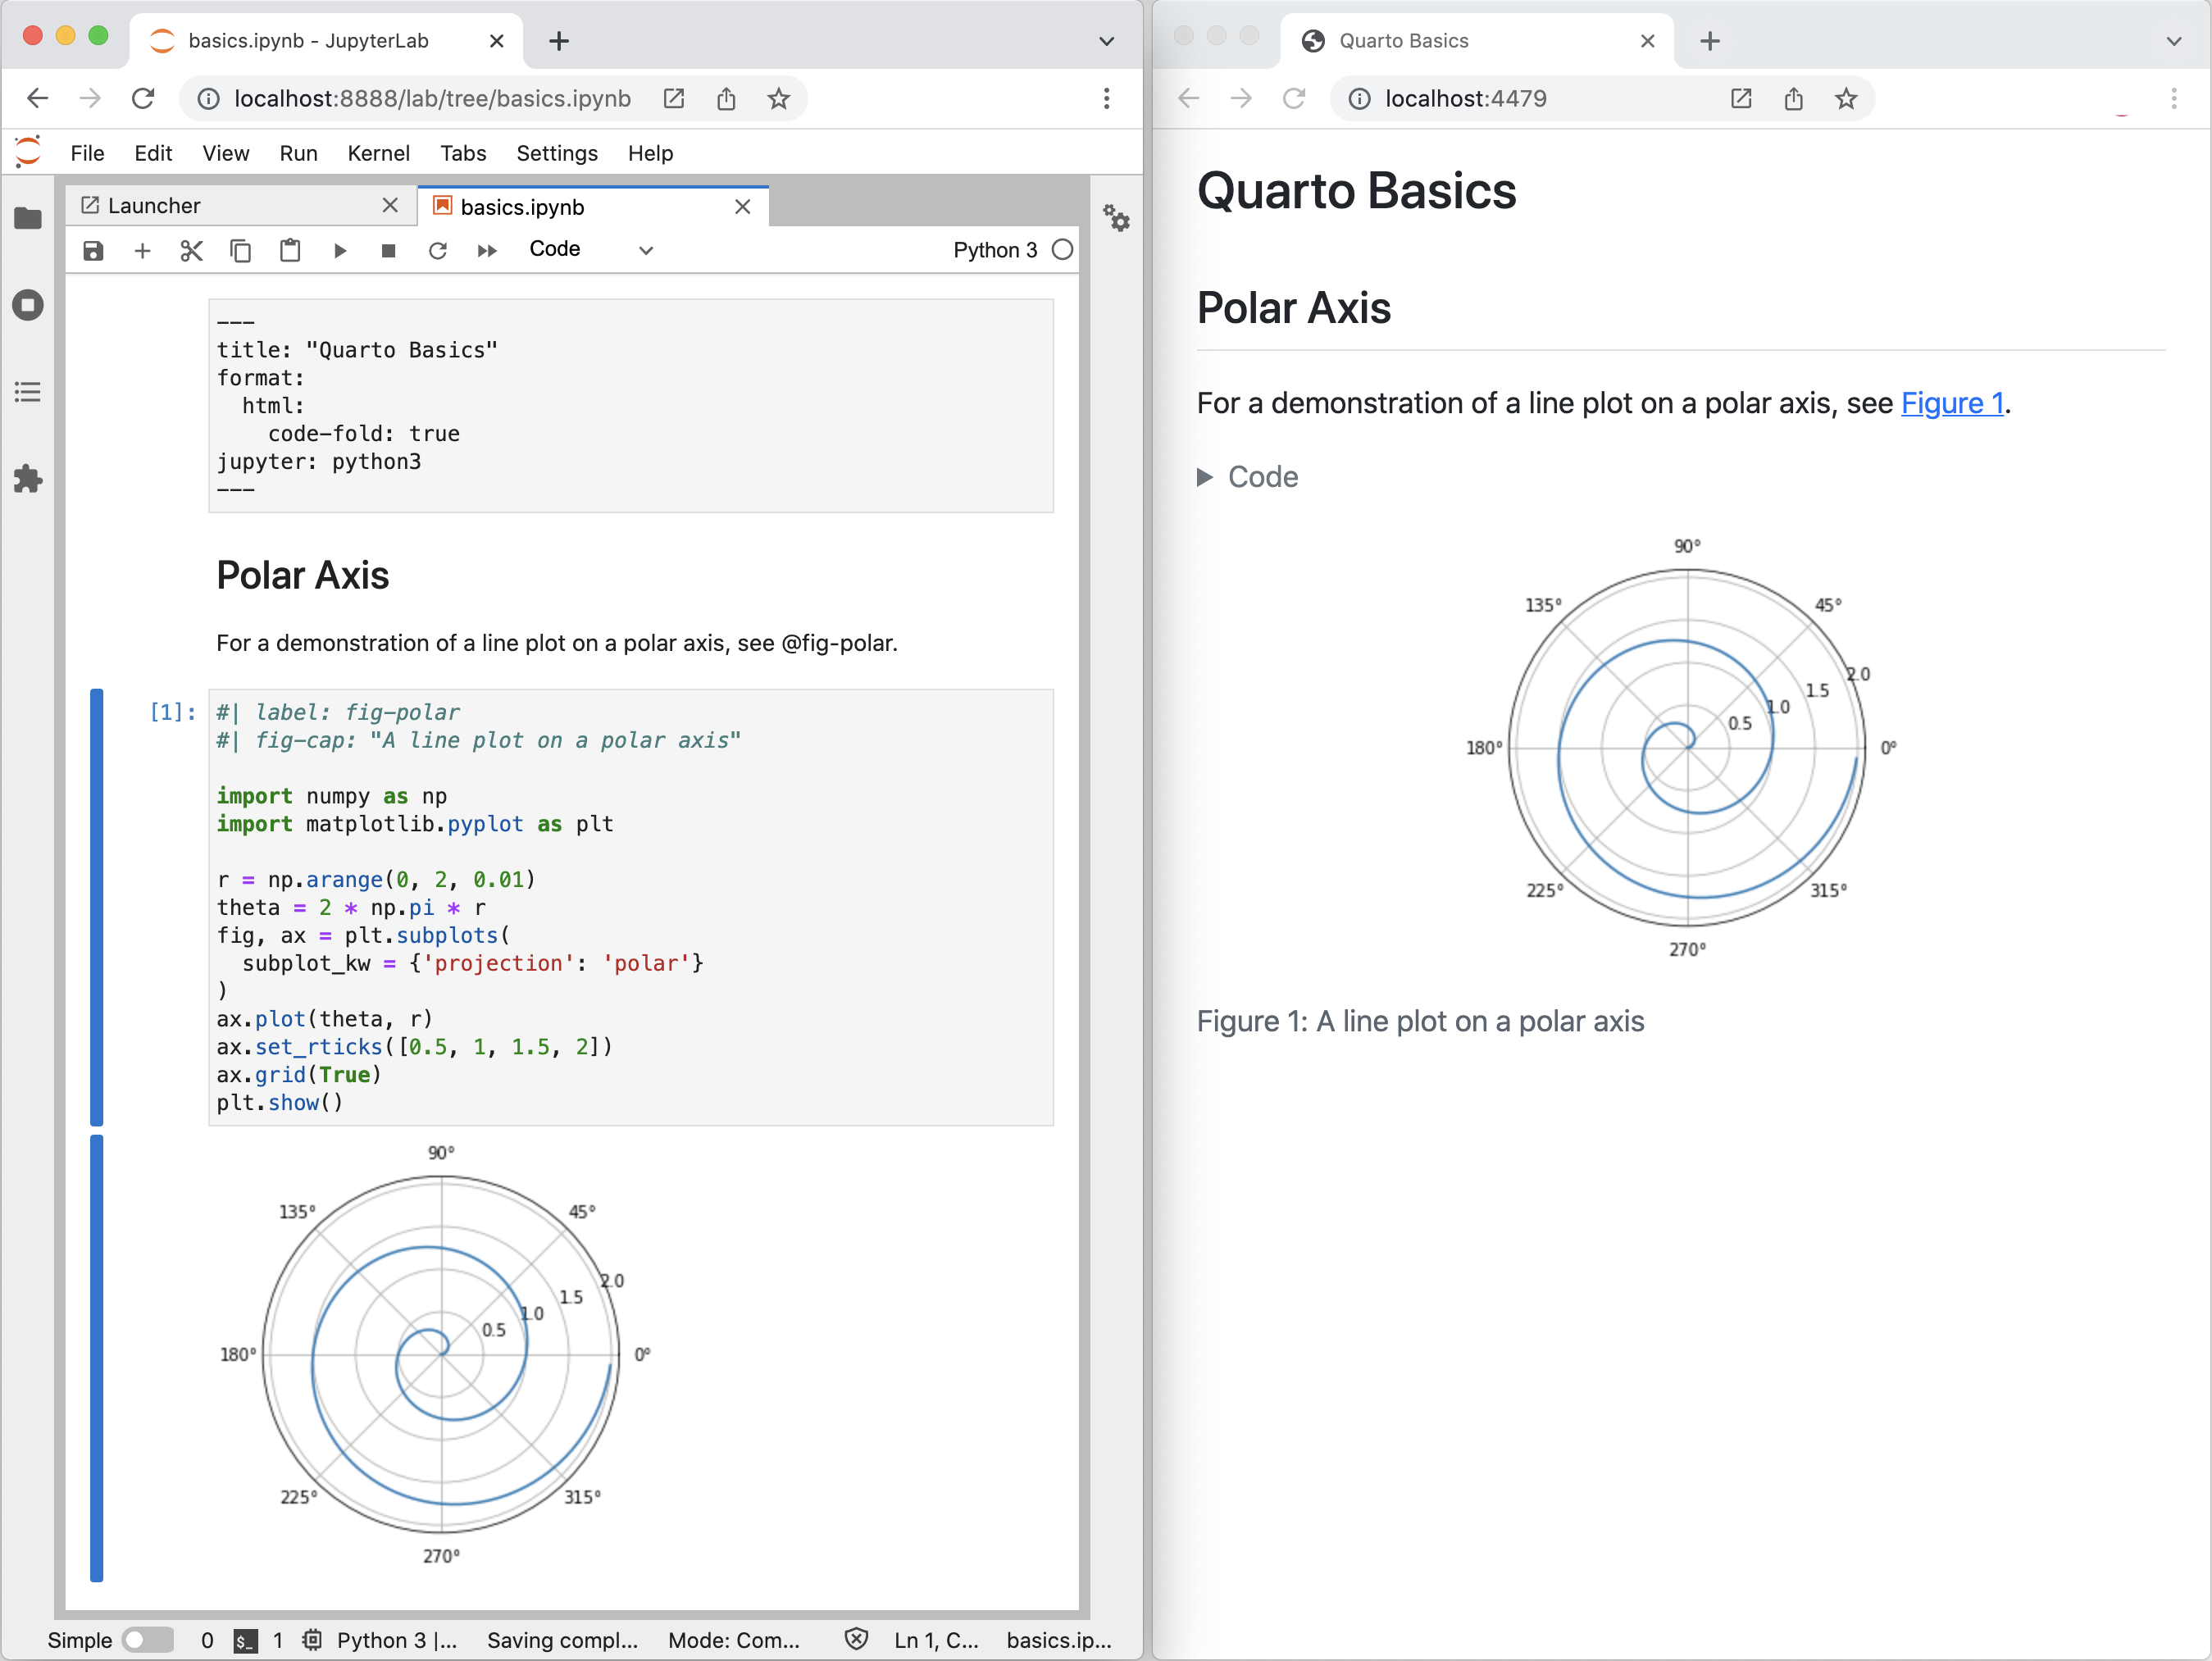
Quarto Structure
Quarto files have 3 different types of content:
1. The YAML
In a cell of type “Raw”, displayed between two series of --- signs, it corresponds to the metadata shown in the header of the output file (e.g., title, author, date, …) and the type of output (e.g., pdf, html, doc, …)
2. The Text
Written in Markdown style (i.e., text without formatting), it is used as core description in the output document
3. The Code
Inserted in the Quarto inside code cells, the code is processed when creating the output and can display figures and tables
1. The YAML
The YAML
Simple
---
format: html
---
Default
---
title: Quarto Basics
format: html
date: "99/99/9999"
---
Warning
indentation is very important, every line finishing with : involves 1 Tab indentation on the following line.
---
title: Quarto Basics
date: "99/99/9999"
format:
  html:
    code-fold: true
---
Execute Python Code
Quarto can use R or Python to execute code
- Python code is executed natively with the
python3engine
- Quarto can also use the
jupyterengine to execute Julia, Python, or other languages that Jupyter supports
2. Markdown Style
Overview
Markdown is a plain text format that is designed to be easy to write, and, even more importantly, easy to read:
A Markdown-formatted document should be publishable as-is, as plain text, without looking like it’s been marked up with tags or formatting instructions. – John Gruber
This document provides examples of the most commonly used markdown syntax. See the full documentation of Markdown for more in-depth documentation.
Text Formatting
| Markdown Syntax | Output |
|---|---|
| italics, bold, bold italics | |
| superscript2 / subscript2 | |
verbatim code |
Headings
| Markdown Syntax | Output |
|---|---|
Header 1 |
|
Header 2 |
|
Header 3 |
|
Header 4 |
|
Header 5 |
|
Header 6 |
Links
| Markdown Syntax | Output |
|---|---|
| https://quarto.org | |
| Quarto |
Images
Images are created using a similar notation to links.
They are done in the format
![]()
- The ! lets markdown know it’s an image
- Inside the [] you can optionally put a caption.
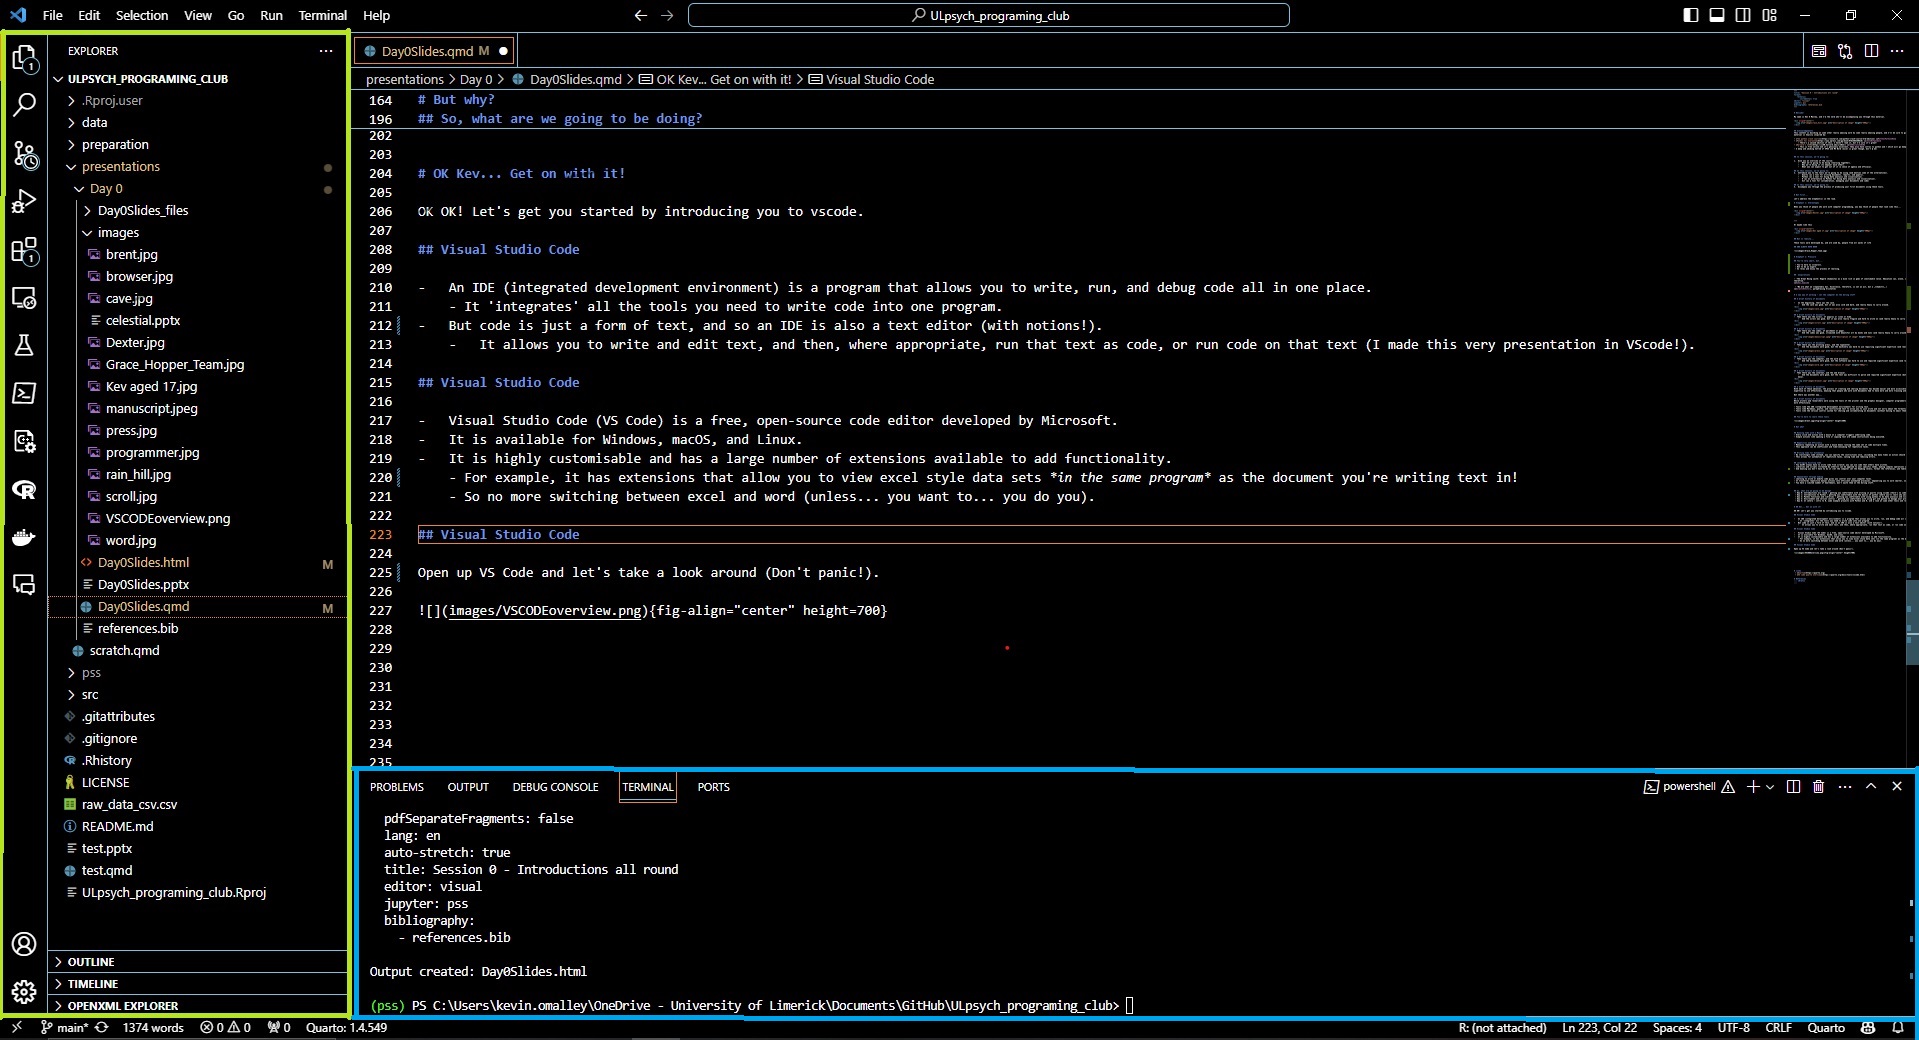
- Inside the () you place a link to the image relative to the location of the document OR on the web.
Web Image Example


Local Image Example

This points towards an image where there is a folder called ‘resources’ at the same level as the .qmd file being written. It moves into the resources folder, then looks for an image called cover_image.jpeg.

Image of a white robot surrounded holding a magnifying glass
Images
| Markdown Syntax | Output |
|---|---|
 |
|
|
|
|
List
List
List
List
Note that unlike other Markdown renderers (notably Jupyter and GitHub), lists in Quarto require an entire blank line above the list.
Otherwise the list will not be rendered in list form, rather it will all appear as normal text along a single line.
Footnotes
Markdown supports numbering and formatting footnotes using the following syntax:
Here is a footnote reference,[^1] and another.[^longnote]

[^1]: Here is the footnote.

[^longnote]: Here's one with multiple blocks.

    Subsequent paragraphs are indented to show that they
belong to the previous footnote.

        { some.code }

    The whole paragraph can be indented, or just the first
    line.  In this way, multi-paragraph footnotes work like
    multi-paragraph list items.

This paragraph won't be part of the note, because it
isn't indented.
Footnotes
The above syntax generates the following output:
Here is a footnote reference,1 and another.2
This paragraph won’t be part of the note, because it isn’t indented.
Footnotes
In addition, you can also write single paragraph footnotes inline using the following syntax:
This syntax generates the following output:
Here is an inline note.1
Footnotes
Footnote IDs should be unique
Footnote identifiers, e.g., the 1 in ^1, need to be unique within a document. In Quarto books, chapters are combined into a single document for certain formats (including PDF, DOCX, and EPUB), so footnote identifiers need to be unique across chapters.
The footnotes that are generated from the above examples are included in the Example Footnotes section at the bottom of the page. See the Markdown Footnotes for additional information.
Tables
Markdown Syntax
Output
| Right | Left | Default | Center |
|---|---|---|---|
| 12 | 12 | 12 | 12 |
| 123 | 123 | 123 | 123 |
| 1 | 1 | 1 | 1 |
Learn more in the article on Tables.
Raw Content
Raw content can be included directly without Quarto parsing it using Pandoc’s raw attribute. A raw block starts with ```{= followed by a format and closing }, e.g. here’s a raw HTML block:
You can also include raw content inline:
Equations
Use $ delimiters for inline math and $$ delimiters for display math. For example:
| Markdown Syntax | Output |
|---|---|
| inline math: \(E=mc^{2}\) | |
display math: \[E = mc^{2}\] |
Diagrams
Quarto has native support for embedding Mermaid and Graphviz diagrams. This enables you to create flowcharts, sequence diagrams, state diagrams, Gantt charts, and more using a plain text syntax inspired by markdown.
For example, here we embed a flowchart created using Mermaid:
flowchart LR
  A[Hard edge] --> B(Round edge)
  B --> C{Decision}
  C --> D[Result one]
  C --> E[Result two]
Learn more in the article on Diagrams.
Videos
You can include videos in documents using the {{< video >}} shortcode. For example, here we embed a YouTube video:
You can also use raw html code chunks:
Videos can refer to video files (e.g. MPEG) or can be links to videos published on YouTube, Vimeo, or Brightcove. Learn more in the article on Videos.
Divs and Spans
You can add classes, attributes, and other identifiers to regions of content using Divs and Spans (you’ll see an example of this below in Callout Blocks).
For example, here we add the “border” class to a region of content using a div (:::):
Once rendered to HTML, Quarto will translate the markdown into:
Divs and Spans
Divs start with a fence containing at least three consecutive colons plus some attributes. The Div ends with another line containing a string of at least three consecutive colons. The Div should be separated by blank lines from preceding and following blocks.
Divs may also be nested. For example:
Divs and Spans
A bracketed sequence of inlines, as one would use to begin a link, will be treated as a Span with attributes if it is followed immediately by attributes:
Once rendered to HTML, Quarto will translate the markdown into:
Typically, you’ll use CSS and/or a Filter along with Divs and Spans to provide styling or other behavior within rendered documents.
Ordering of Attributes
Both divs and spans in Pandoc can have any combination of identifiers, classes, and (potentially many) key-value attributes. In order for these to be recognized, they have to be provided in a specific order: identifiers, classes, and then key-value attributes. Any of these can be omitted, but must follow that order if they are provided. For example, the following is valid:
However, the following will not be recognized:
This ordering restriction applies to both divs and spans. See the documentation on Divs and Spans for additional details.
Callout Blocks
Markdown Syntax
Output
Note
Note that there are five types of callouts, including note, tip, warning, caution, and important.
Learn more in the article on Callout Blocks.
Other Blocks
Special Characters
| Markdown Syntax | Output |
|---|---|
| endash: – | |
| emdash: — |
Keyboard Shortcuts
The kbd shortcode can be used to describe keyboard shortcuts in documentation. On Javascript formats, it will attempt to detect the operating system of the format and show the correct shortcut. On print formats, it will print the keyboard shortcut information for all operating systems.
For example, writing the following markdown:
will render the keyboard shortcuts as:
To print, press Shift-Ctrl-PShift-Ctrl-P. To open an existing new project, press .
Markdown Example
Example of a markdown document…
## Introduction


Welcome to my **awesome** class. You
will learn all kinds of useful things
about Quarto.


- Markdown is simple
- You can add `python` code
Here’s what the output looks like…
Introduction
Welcome to my awesome class. You will learn all kinds of useful things about Quarto.
- Markdown is simple
- You can add
pythoncode
Quarto platforms
Quarto can be used with any platform.
A tutorial is offered for the following ones at https://quarto.org/docs/get-started/hello:

Thanks for your attention and don’t hesitate to ask if you have any questions!
@damien_dupre
@damien-dupre
https://damien-dupre.github.io
damien.dupre@dcu.ie