05:00
Lecture 4: Git, GitHub, and Version Control
BAA1028 - Workflow & Data Management
Damien Dupré
Automated Version Control (AVC)

Automated Version Control (AVC)
- A system that automatically manages changes to files, typically in the context of software development.
- Keeps track of every modification to the code in a special kind of database.
- If a mistake is made, developers can turn back the clock and compare earlier versions of the code to help fix the mistake while minimising disruption to all team members.
Automated Version Control (AVC)
Automated Version Control (AVC)
Automated Version Control (AVC)
- Backup and restore: Changes are stored securely and can be restored at any point.
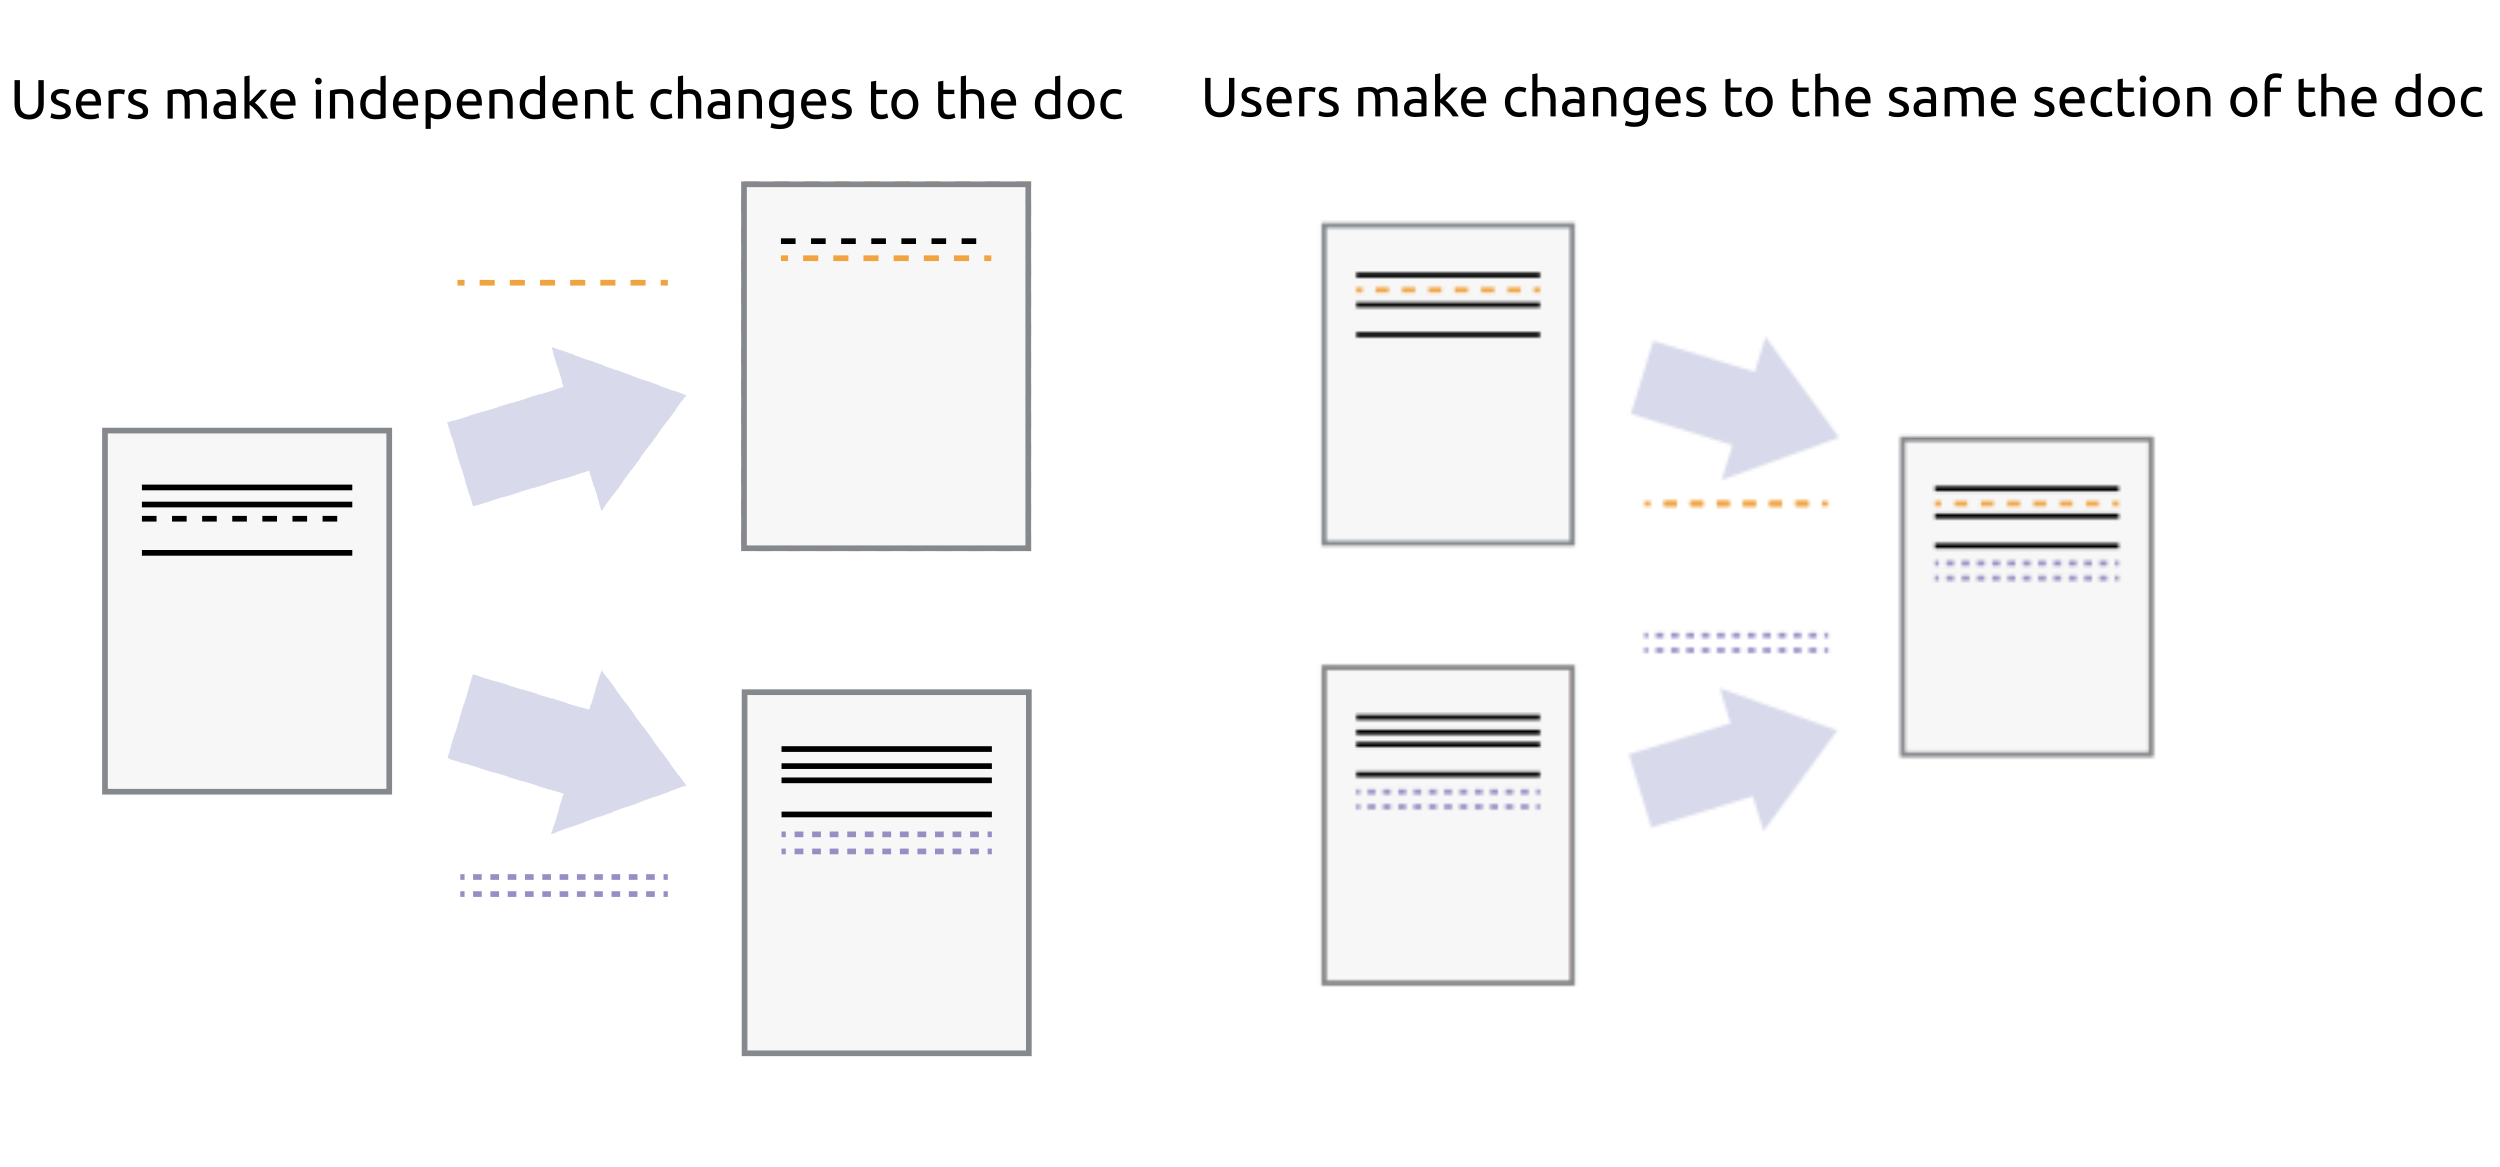
- Collaboration: Multiple people can work on the same project at the same time.
- Track changes: You can see who last modified something that might be causing a problem, who introduced an issue, when it was introduced, and more.
- Explore alternatives: Safely experiment with new ideas in a branch, without affecting the main project.
Introduction to Git and GitHub
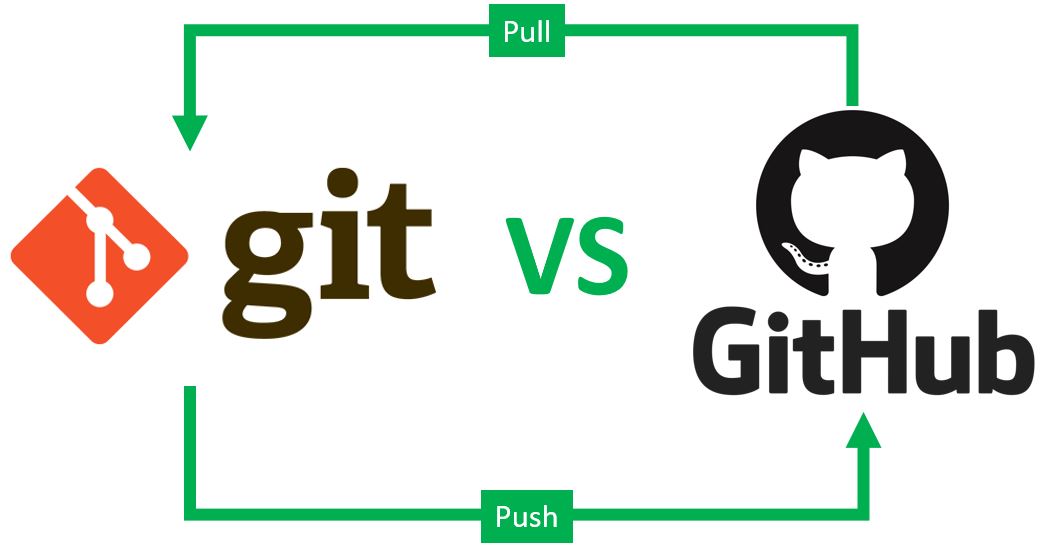
- Git: A version control system that lets you manage and keep track of your source code history.
- GitHub: A cloud-based hosting service that lets you manage Git repositories.
- Benefits:
- Track changes in your code across versions.
- Collaborate with others on projects.
- Backup your work on the cloud.
What is Git ?
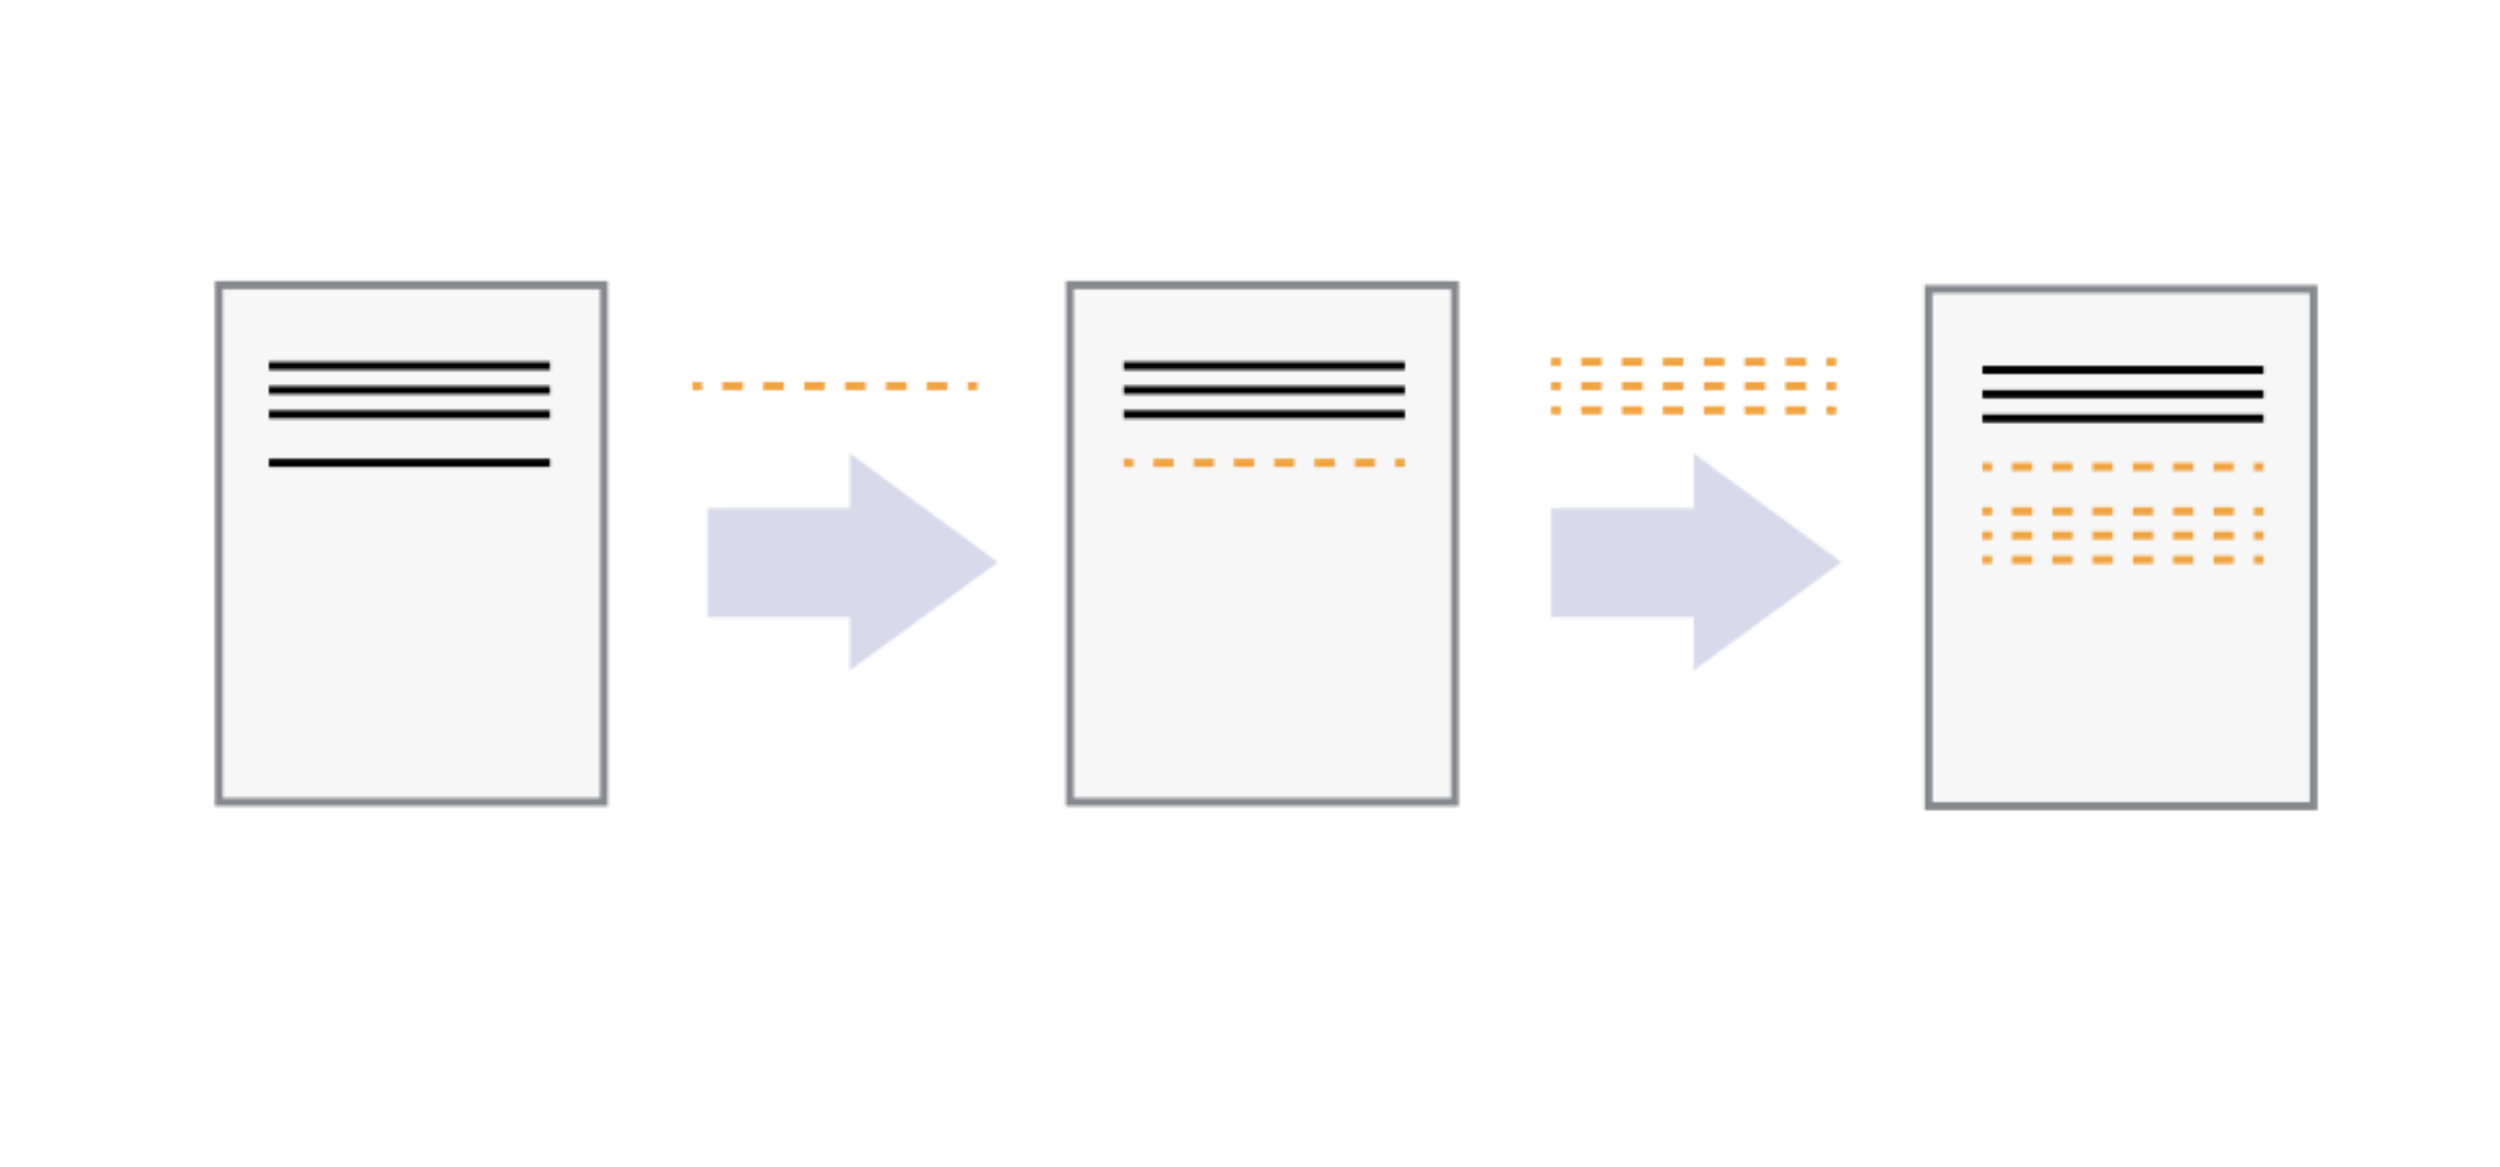
It’s a version control system, which works like a time machine. In this time machine, it has check points which is known as Commits and it’s unique for every check point.
It has a super cool feature like multiverse aka Branching, that lets us create an alternate version of our code. A branch is a copy of project and it’s super useful when working in groups, allowing us the capability of working on with or without changing the original code. We can also synchronize the changes that happened across different branches and that’s called Merging.
GitHub is nothing without Git

What is a Git repository?
- A place where you can store your code, your files, and each file’s revision history.
- Contains a
.gitfolder at the root which does all the git magic behind the scenes.
Check if Git is Already Installed
To check if Git is already installed, run the following in the Terminal:
MacOS
If Git is NOT installed, a pop-up window will appear asking if you want to install the “command line developer tools”. Click Install or Agree.
Downloading and Installing Git
- MacOS
Open Terminal and type:
MacOS will ask to install the Command Line Tools. Click Install and wait for it to finish.
If that does not appear, use the following code:
This will install Git as well. Then check that Git is there by running:
- Windows
Download the installer from https://git-scm.com/downloads
Run keeping all the default settings.
Use git --version again to check that Git is installed.
If the Windows installer hangs with the progress bar at 100%:
- Press Ctrl + Alt + Delete;
- Find Git for Windows installer and close.
Git Bash for Windows
Git, the version control manager software, comes with Git Bash on Windows.
Git Bash is the same Bash as the one used in Linux and MacOS.
However, all Command-Lines to use Git can be run not only in Git Bash, but also with cmd and PowerShell.

Setting up Git
Setting up your identity is the first essential step after you install Git on your computer. When you save your work in Git, which is known as a commit, the software attaches your name and email address to that save. This is very important because it lets you and other people know exactly who made specific changes to the code. You usually only need to configure this one time, and Git will remember it for all your future projects.
To set up the basic changes we will run git config command.
Warning
It is best to use the same email address that you used for code hosting websites like GitHub or GitLab.
Your Turn: Setting up Git
In your terminal, type your GitHub Name and Email:
Example:
Setting up Git
The global option makes sure that every project in that local machine will use that name and email address.
To see all the global configuration we can run the below command:
To see where the settings file are defined, we can run bellow command:
Version Control with your Local Repository and GitHub
Connect Git and GitHub
Connect Git and GitHub
Manually create the
my_new_projectrepository in theprojectsfolder on your computer and add a text file calledhello.txt.Manually create the
my_new_projectrepository on GitHub.
Important
Leave the boxes for “Add a README file” and “.gitignore” empty because checking them will cause errors.
- Connect your local repository with your remote repository:
This command acts like a switch that tells Git to wake up and start watching this specific folder for any changes you make.
Add, Commit, and Push
Next, do your first commit using:
Finally, to push your first commit on the remote repository, you need:
The terminal or a pop up window will ask you to sign in to your GitHub account to prove you have permission to write there.
Go back to your browser and refresh the page to see your files are now safely stored online.
Add, Commit, and Push Again
After pushing this first init commit, all the snapshot of the projects can be taken using:
Your Turn: Init Repository
Create the local repository
another_testin theprojectsfolder. Add ahello.txtfile manually.Create the remote repository
another_teston GitHub.Connect your local repository with your remote repository:
- Do your first commit:
05:00
Version Control with Someone Else’s Repository on GitHub
Connect Git and GitHub
Connect Git and GitHub
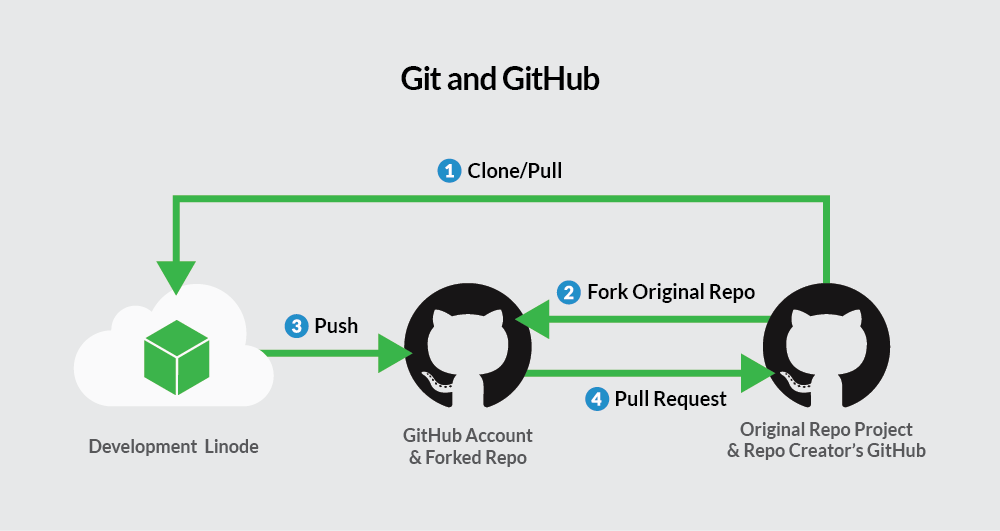
- Clone the repository on your computer, for example:
- On the GitHub repository, click
Forkto copy on your own account:

- Connect your local clone with the remote fork:
Add, Commit, and Push
This will create a new tracked folder on your computer called my_simple_website with all the files contained in this folder.
You can modify these files as normal. Then when you want to save, use:
Finally, to push your changes on the remote repository, just use:
Your Turn: Clone Repository
- Clone the repository
my_simple_websitefrom thedamien-dupreGitHub account to your local computer using the terminal:
- Modify the h1 header of
my-first-web-page.html, add, commit, and push your modification to a new repository on your GitHub account:
- Modify the background colour of
my-first-web-page.html, add, commit, and push your modification to the remote repository:
05:00
Understanding Git
Init and Clone
Both ways will create a .git file in the same directory and by default it’s hidden. To see that, we need to type ls -la command on terminal.
git init or git clone commands initialize the project for us and make files that are necessary for keeping track of our changes. We can change the directory to see what files have been created by the git init or git clone commands.
It will display that git has created a several files to keep the tracks of our changes.
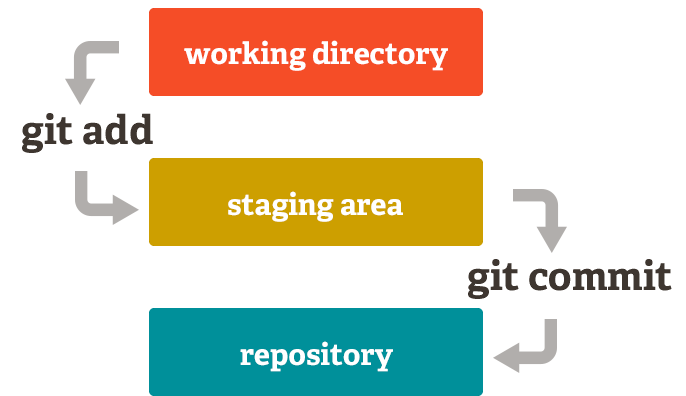
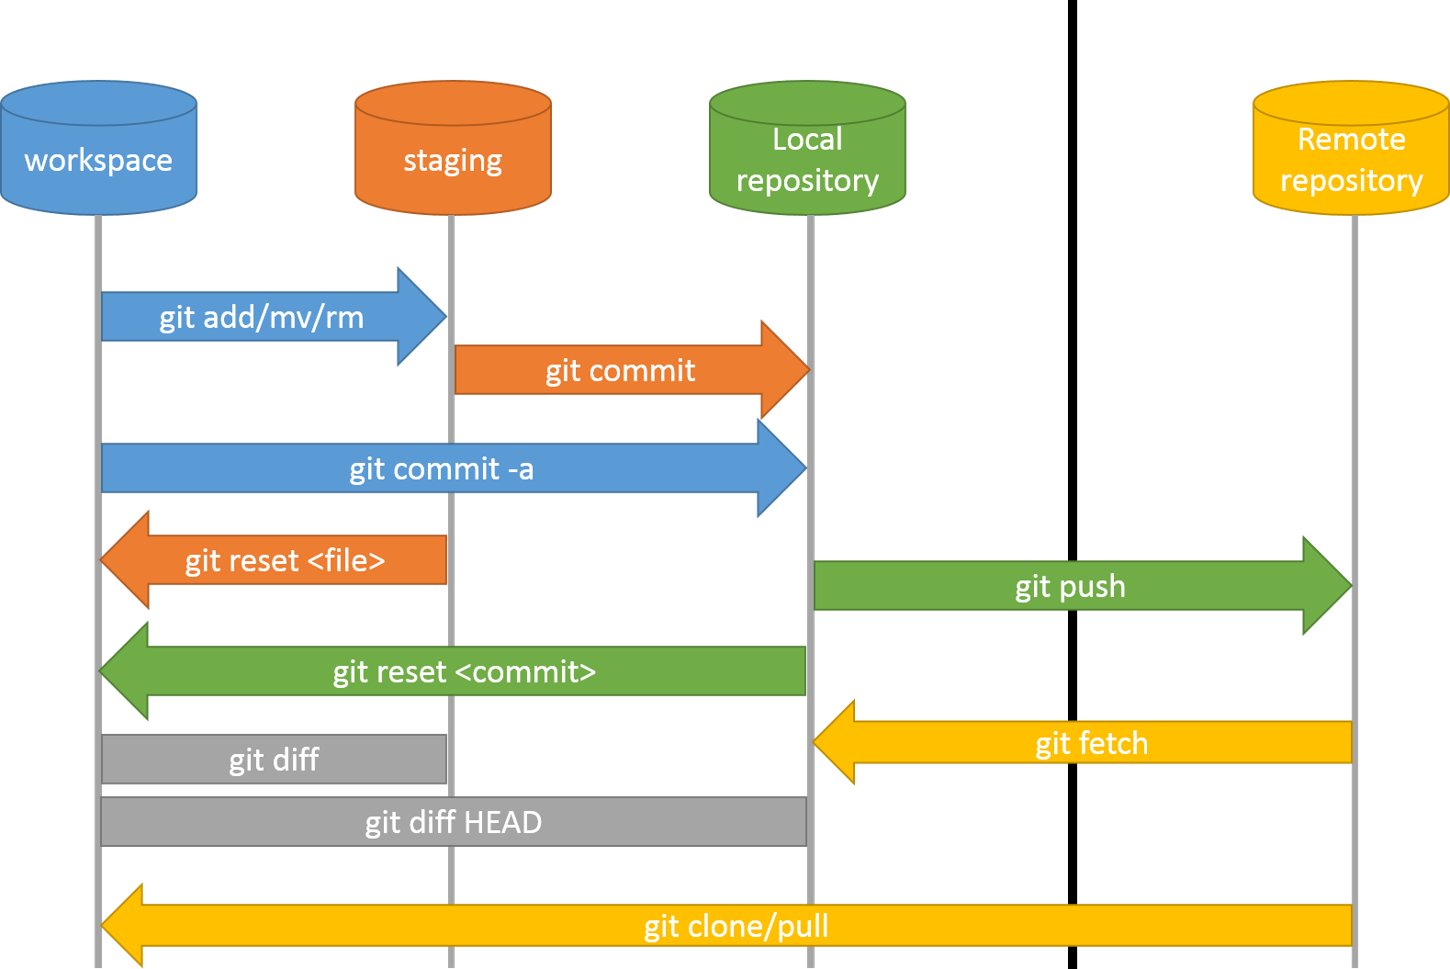
Git Add
After initializing the git, we need to add the files in the staging environment with git add command. Staging is a temporary area that we can store files that we want to commit later.
# Basic command for adding Files
git add filename.extension # it adds single file at a time and it's a good
practices
# Alternative Options
git add --all # it adds all the file in the directory to the staging environment
git add -A # does the same thing as --all but it's a shortcut
git add . # same as --all and -A
Git Commit
- You can think of a commit as a snapshot of your work at a particular time
- You can navigate between commits easily with git
- This allows you to switch easily between different versions of your work
- When you commit, rather than saving all the files in a project every time, git is efficient and only stores the files which have been changed between the previous commit and your current one
- The commit also stores a reference to its parent commit
Git Commit
This means that Git has four main states that your files can be in:
- Untracked: You’ve created a new file and not told git to keep track of it.
- Modified: You’ve changed a file that git already has a record of, but have not told git to include these changes in your next commit. We say these files are in the working tree.
- Staged: You’ve told git to include the file next time you do a commit. We say these files are in the staging area.
- Committed: The file is saved in it’s present state in the most recent commit.
Git Commit
Git Commit
Last step is to commit the changes using the git commit command.
git commit message should be short and precise. What are the changes being made, why are the changes and the functionalities it will add.
git commit message should be like email subject.
Working with remote repositories
git clone: creates a copy of the codebase on your local machine.git push: pushes changes back to the remote repository.git pull: pulls changes from the remote repository.
Working with remote repositories
GitHub
- Git repository hosting service
- Collaborate with others on codebase
- Pull requests for code review and merging changes
- Issue tracking and project management tools
- GitHub Pages for hosting websites
Git and GitHub
If you want to update your project with the version hosted on github:
This command pulls changes from the remote repository and merges them into your local branch.
This is useful when you are collaborating on a repository and working on different branches.
Git Information
To verify git is keeping the track of our work we can use git log command.
It will show the entries that has been made in the .git folder. It shows the commit hash, author name, date with timestamp, and commit message.
Git Information
git log command shows us some information about the commits that has been made. I will use the output of our first commit.
git log
# Below is the output
commit 1b12ec3c6bc7dfc48fa33c3ae655564a02700162 (HEAD -> main) # commit hash, which is unique for every commit
Author: Shuvo Barman <user@users.noreply.github.com> # Name of the author and email
Date:   Sun Dec 17 16:32:29 2023 -0330 # detailed time of the commit

    Initial commit # commit message
the HEAD always point to the current branch in this case it’s main
Git Environments
We can see this with git status viewing command.
If a file goes into Modified Stage, we have two option for that file. One is adding that file using git add command or we can restore it using git restore command.
Ignoring Files
Even if git is used to keep track of files but sometimes we don’t want to keep track of all the files.
There could be several reasons behind it. Such as:
- Sensitive information(i.e. Password, Authentication tokens, API keys etc.)
- Personal notes(i.e. To-Do list for project)
- System files
- Large files
we can achieve this by creating a new file called .gitignore. Inside this file we can add any types of pattern, file name, folder name etc. which will git ignore. Git doesn’t track empty folders.
Ignoring Files
we can also use global ignore file to ignoring files or pattern that we don’t want git to upload.
Clearing the cahce using below command.
Deleting
It can be done in two ways, from command line and another is doing manually from the IDE interface. we use git rm command to delete file.
If we delete the file using git rm command, it deletes the file and moved that deletion automatically into staging. But if we do it manually from IDE interface we have do move that file from staging.
Deleting
After deleting a certain file using git rm command, if we want to restore the file we need to execute below command
after executing the above command we have to execute below command as well.
Renaming
This is a tricky part if we do it from the IDE interface manually. It will track two action: first deletion of certain file and second creating a new file. if we want to restore the manually renamed file using git restore command, git will keep both the files.
To do it from the command line we have to use git mv command
To restore the renamed file to it’s previous name, we can use the same command git mv with just changing the order of file names.
Branches
to see the brances we can use git branch command. It will show all the available branc in our project.
To create a new branch we will have to take a copy of a snapshot from another branch and start working from there. To do so,
Branches
git merge command will merge the changes from one branch into the current branch.
When we merge a feature into main branch, it’s a good idea to delete that branch. To do that, we use below command
These sequence of doing things is also called git flow.
Best practices
When working alone:
- Commit often
- Use descriptive commit messages
- Review code regularly
- Use .gitignore to exclude files
- Don’t commit data (only very small test data)
- Don’t commit passwords
When working with a team:
- Keep pull requests small and focused
- Use “issues” to track work
References
Huge thanks the following people who have generated and shared most of the content of this lecture:
Zoë Turner: Introduction to Git and GitHub Session - Prework for a computer
Miguel Xochicale: Introduction to git and GitHub
James Emberton, Amy Pike and Marion Weinzierl: Git for beginners
Joe Wallwork and Tom Meltzer: Intermediate Git and GitHub


Thanks for your attention and don’t hesitate to ask if you have any questions!
@damien_dupre
@damien-dupre
https://damien-dupre.github.io
damien.dupre@dcu.ie